
Getting Started with Hytale
This guide walks you through setting up your Hytale server, including the required authorization process.Step 1: Access Your Server
- Log in to the Game Panel
- Select your Hytale server
- Wait for the initial installation to complete
Step 2: Complete Authorization
After your server installs, you must authorize it with your Hytale account. This is a required step before your server can run.First Authorization URL
Watch the console for an authorization URL. Click the link or copy it to your browser.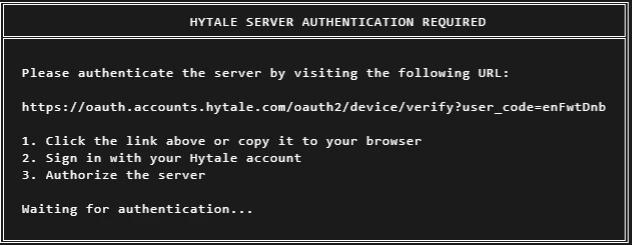
Enter the Code
On the authorization page, enter the code shown in your console and accept the authorization.
Second Authorization URL
After the first authorization, another URL will appear in the console. Click this link to complete the final authorization.
Step 3: Configure Important Settings
Before inviting players, check the Startup tab for important settings:| Setting | Default | Recommendation |
|---|---|---|
| Allow Operators | 1 | Set to 0 for public servers |
| Auth Mode | authenticated | Keep as authenticated for online play |
| Memory Overhead | 0 | Set to 2048 (reserves 2GB for system) |
| Automatic Update | 1 | Keep enabled for latest updates |
Step 4: Connect to Your Server
Once authorization is complete and the server is running:- Launch Hytale
- Go to Multiplayer
- Add your server using the IP and port from the Network tab in the Game Panel
- Connect and play!
Server Information
Find your connection details in the Game Panel:- Network tab shows your server IP and port
- Share this information with friends to let them join
Next Steps
Configure Settings
Review all server variables
Add Mods
Install mods using the built-in installer